October 3, 2022
Dryer Repair
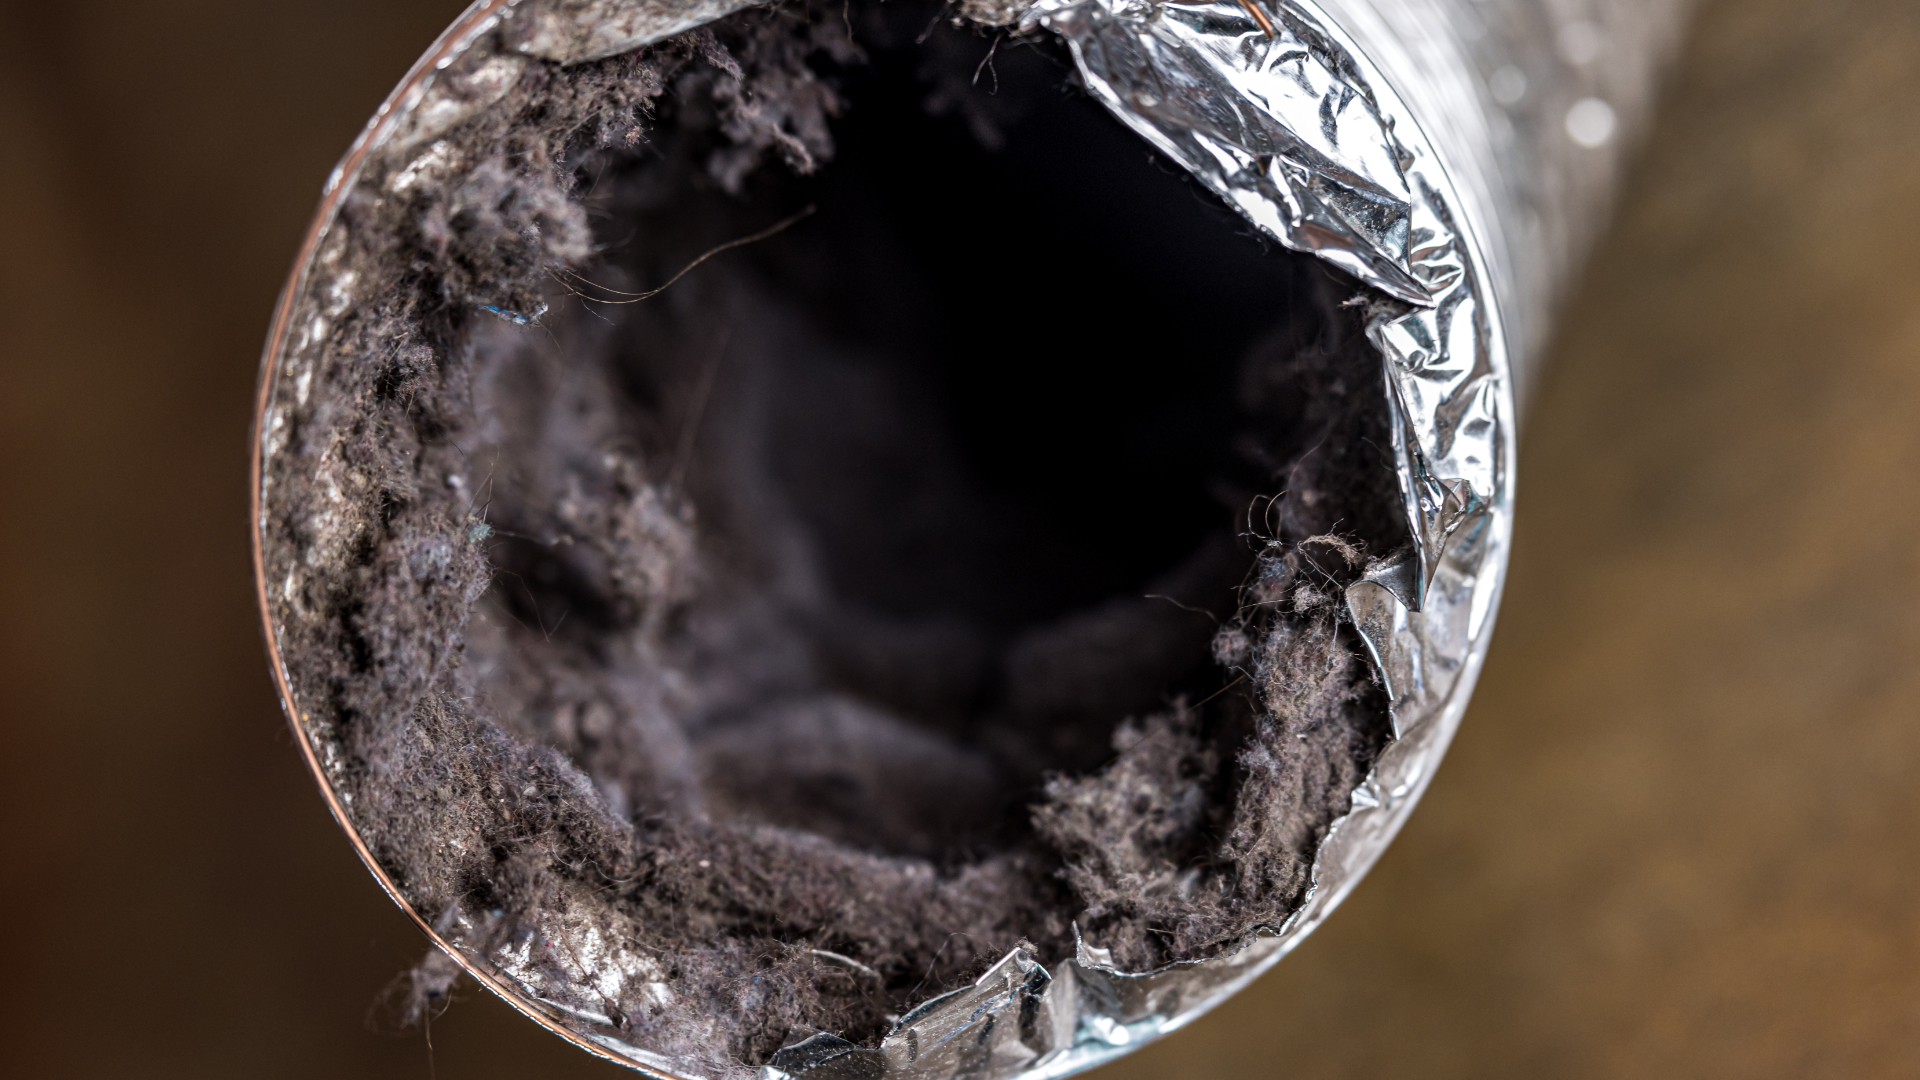
Clogged dryer vents are a serious fire hazard. In fact, lint buildup is one of the leading causes of house fires in the United States. A clean dryer vent also significantly reduces your energy bill and prolongs the life of your dryer. The best way to prevent lint buildup is to empty the lint trap after every cycle, but even with this preventive measure, you should still clean your vent once a year.
How to tell your dryer vent needs cleaning
If your clothes are taking longer than normal to dry, it may be a sign that your dryer vent is clogged and in need of a good cleaning. Lint and other debris can build up over time, reducing airflow and making it harder for your dryer to do its job.
In addition to longer drying times, you may also notice that your clothes are hotter than usual, or that the outside of your dryer is extremely hot to the touch. There also may be more lint than usual when you empty the lint trap. If you suspect that your dryer vent is clogged, there are a few things you can do to clean it out.
Why you should clean your dryer vent
Most people don’t realize that their dryer vent is a potential fire hazard. Lint buildup in the vent can block the flow of air, causing the dryer to overheat and potentially catch fire. In addition, a blocked vent can also cause your dryer to use more energy, costing you money on your utility bills. That’s why it’s important to clean your dryer vent on a yearly basis.
You can do this yourself by disconnecting the vent from the dryer and using a vacuum cleaner with a hose attachment to remove the lint. However, if you don’t feel comfortable doing this, you can hire a professional to do it for you. Taking these simple steps can help to keep your home safe from fire hazards and save you money in the long run.
Here’s how:
1. Gather your cleaning supplies
To get started, you’ll need:
- gloves
- a bag or trash can for the lint
- a vacuum with a hose attachment
- a dryer vent brush
- you may also need a ladder if your vent is located high up on the wall
- some duct cleaning brushes*
*While there are many ways to clean air ducts, one of the most effective methods is to use an air duct cleaning brush. These brushes are designed to reach deep into the crevices of the ductwork, removing all the dirt and grime that has accumulated over time. Air duct cleaning brushes can be purchased at most hardware stores or online retailers. When choosing a brush, it is important to select one that is the right size for your particular air ducts. Additionally, you will need to choose a brush with stiff bristles in order to effectively remove all the dirt and debris from the ductwork.
2. Move the dryer away from the wall
Before you begin any repair or maintenance work on a gas dryer, it is important to disconnect the power and gas supply. This will help to prevent any accidents or injuries. To disconnect the power, start by unplugging the dryer from the wall outlet. If the dryer is hardwired, you will need to flip the circuit breaker to the ‘off’ position.
Once the power is disconnected, you can move on to disconnecting the gas supply. Start by shutting off the valve that supplies gas to the dryer. Once the valve is closed, you can unscrew the flexible gas line from the connection point on the back of the dryer. With both the power and gas supply disconnected, you can safely proceed with your cleaning.
3. Use a vacuum attachment to clean any lint that has accumulated around the opening of the vent
After you’ve cleaned the opening of the vent, then, detach the exhaust duct from the dryer and vacuum out both the duct and the connection point. Be sure to vacuum both the inside and outside of the duct.
4. Insert a dryer vent cleaning brush into the vent and scrub all surfaces to remove any remaining lint
The best way to clean the dryer duct is with a vent brush. Vent brushes come in different sizes, so it’s important to choose one that will fit your particular dryer duct. To use the brush, simply insert it into the duct and move it around until you’ve dislodged all the built-up lint. Then, vacuum up the debris and you’re done.
5. Reattach the dryer venting tube and plug your dryer back into the outlet
Once you’ve cleared the obstruction, reattach the duct and plug in the dryer.
How to keep your dryer vent lint free
One of the best ways to keep your dryer running efficiently is to regularly empty the lint trap. The lint trap is located either on the top of the dryer or on the front. It should slide out and look like a mesh screen. To empty it, simply remove the lint screen and empty the lint into the trash. You may need to use a small brush to remove all of the lint from the screen. Once you’ve removed the lint, put the screen back in place and close the dryer door. That’s all there is to it! By taking this simple step, you can prolong the life of your dryer and help it run more efficiently.
Some dryer ducts, like foil, plastic or vinyl ones, are much more prone to clogging. Replacing these types of ducts with a rigid metal duct will reduce the amount of lint build-up, and the fire risk. If that is not possible, just take care to make sure you clean your duct on a regular basis and keep an eye out for the signs it needs cleaning.
By following these simple steps, you can easily clean your dryer vent and prevent a dangerous lint buildup. Remember to empty your lint trap after every cycle and schedule a yearly cleaning to keep your home safe and your clothes drying efficiently.

Apr. 09, 2024
Eliminate the Burning Smell From Your Microwave

Apr. 09, 2024
Fixing a Samsung Freezer That Won’t Freeze

Apr. 09, 2024
Whirlpool Oven Won’t Heat: Here’s What To Do

Mar. 06, 2024
Easy Steps to Clean Your Refrigerator Coils

Mar. 06, 2024
Quick Fixes for an LG Dryer Not Heating

Mar. 06, 2024
How to Fix an Electrolux Dryer That’s Not Drying

Feb. 05, 2024
Why Is Your Whirlpool Washer Lock Light Flashing?

Feb. 05, 2024
Why Is Your Freezer Door Not Sealing?

Feb. 05, 2024
How Does a Ventless Dryer Work?

Jan. 03, 2024