July 11, 2018
Oven Repair
Having an oven that won’t heat properly is never a fun experience. One day you’re making your dinner, and you put the food in to cook for an hour. You come back later, hungry and ready to eat, only to find that your food is nowhere near cooked. Now not only do you need to make new plans for dinner, but you have to figure out what’s going on with your oven.
If you have a GE JBP26G0H3AD oven, then this exact problem could happen to you. An oven that won’t heat properly can be a major inconvenience, but luckily it is usually a simple problem to fix. All you’ll need is a screwdriver and some free time, and you should be able to get your oven running again on your own.
Why Your Oven Won’t Heat Properly
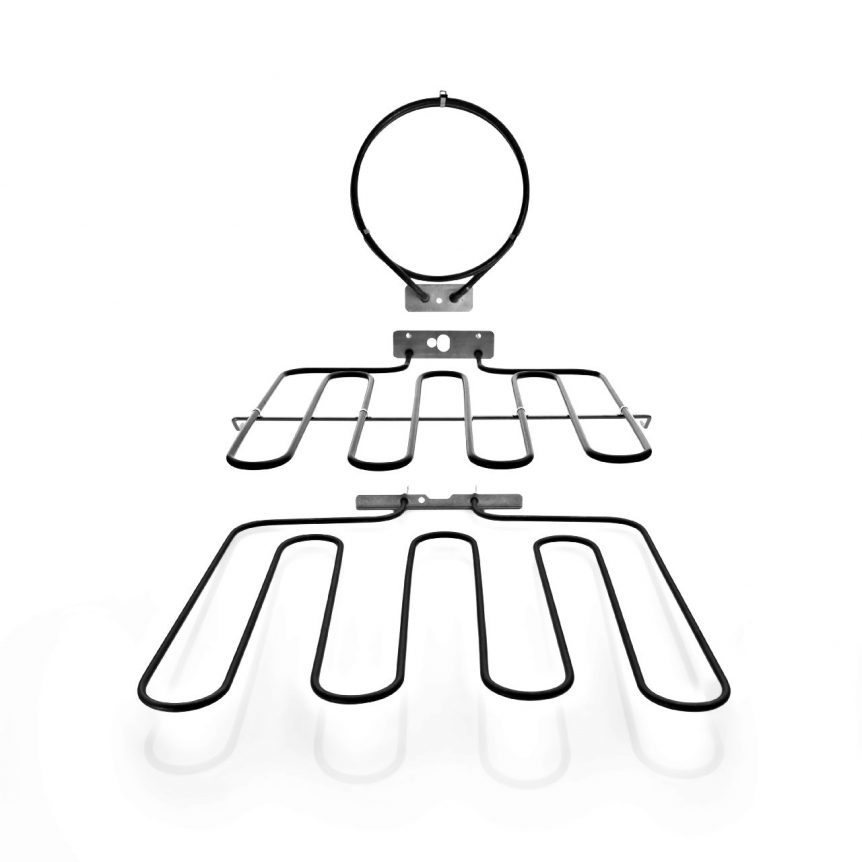
There are a few things that could be the cause of your problem. However, with this model of oven, the likely culprit is the oven’s bake element. This is the element inside the oven that heats it up when you want to bake something. Most ovens have two of these elements, one for baking and one for broiling. If you’re having trouble with your oven heating properly, it’s probably the one for baking that is causing the issue.
Replacing the Oven Bake Element
To get your oven working again, you’ll need to replace the oven bake element. This means first, you’ll have to purchase a replacement part, which you can do here. Once you have the new element, the next thing you’ll need to do is start taking the oven apart. This is simpler than it sounds.
First, take out the oven racks inside the oven. After that, you’ll need to remove the oven door. You can do this by pulling the door up and slightly away from the oven. The door should slide right out, just give it a hard enough pull. Once you have the door out, watch out for sharp edges where the door once was.
The last thing you need to do before you start removing the bad element is to unplug the oven. You can do this by taking out the bottom tray (where you likely keep some pans and trays) and getting underneath your oven. You’ll see a plug in the back – simply disconnect this. You’ll know the unit is unplugged when you see the light inside the oven go out.
With the oven racks and door removed and the unit unplugged, now you can start removing the bad heating element. You should see the heating element inside on the bottom of your oven. It will be connected to the back of the oven with two screws, which you’ll need to remove. Once you take out these two screws, gently pull the unit away from the back of the oven. Two wires will slide out of the back of the oven, connected to the heating element. Using your screwdriver, you’ll want to disconnect these two wires as well.
Now that you have all of the screws out, you can remove the bad unit from your oven. With your bake element removed and the oven unplugged, this is the perfect time to examine the bake element. If you notice any signs of burns, this is a key indicator that the element was indeed the problem. If you have an ohmmeter, you can use this to test for continuity. If your heating element doesn’t have continuity, again, this is a sign that there is a problem with it. Replacing it and installing the new one should fix your problem.
Take your new unit and replace it inside the oven. You should have gotten two screws with your new heating element, so use these to reconnect the wires at the back of the unit. Once you’ve done this, slide everything back in, and replace the other two screws.
You can now put your oven back together. Plug it back in, then replace the bottom tray. Put in the oven racks, and then slide the oven door back into place. Turn on your oven, and see if it heats up like it is supposed to. With a little luck, the problem will have been fixed, and you can go back to using your oven.
What to do When Your Oven is Still Having Problems
If you went through all of the steps above, and you’re still having trouble, it’s time to look for other culprits. You may have an electrical issue, in which case some of the wirings inside your oven will need to be repaired or replaced. Another possibility is that the temperature gauge inside your oven is malfunctioning. In cases like this, the oven thinks it’s heating up to the right temperature when it really isn’t. For these more advanced problems, you’ll likely want to call in an expert repair service for some help.
Tips for Repairing Your Oven
Whenever you attempt to repair your own oven, there are a few things you should keep in mind. First, always make safety your top priority. This means disconnecting the oven from its power source before you go near any wires, along with watching out for any sharp edges. It’s recommended that you wear some protection on your hands so you don’t accidentally hurt yourself.
Besides that, always keep track of everything you’re taking apart. You don’t want to go to put your oven back together, only to realize you’ve lost the tiny screws you needed. Put everything in a safe location, so that you have everything you need to complete the job.
And finally, be sure you are ordering the right part. Going through the entire disassembling process, only to find that the part you ordered won’t fit, is not a fun experience. Whenever you make your purchase, be sure the new part aligns exactly with the model number of your oven.
Hopefully, this guide and these few tips will make repairing your GE JBP26G0H3AD oven a breeze. We know how important an oven is to every home, and with this guide, we hope you’ll be able to get everything working again sooner rather than later.

Apr. 09, 2024
Eliminate the Burning Smell From Your Microwave

Apr. 09, 2024
Fixing a Samsung Freezer That Won’t Freeze

Apr. 09, 2024
Whirlpool Oven Won’t Heat: Here’s What To Do

Mar. 06, 2024
Easy Steps to Clean Your Refrigerator Coils

Mar. 06, 2024
Quick Fixes for an LG Dryer Not Heating

Mar. 06, 2024
How to Fix an Electrolux Dryer That’s Not Drying

Feb. 05, 2024
Why Is Your Whirlpool Washer Lock Light Flashing?

Feb. 05, 2024
Why Is Your Freezer Door Not Sealing?

Feb. 05, 2024
How Does a Ventless Dryer Work?

Jan. 03, 2024